Category Tree Maintenance
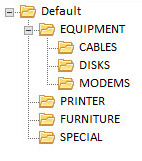
Category Tree represents a hierarchical view of Categories. Items can belong in one or more Categories. Categories can be in one or more Category Trees. This allows for a listing by product type, Manufacture, Product Use, etc.
Navigation
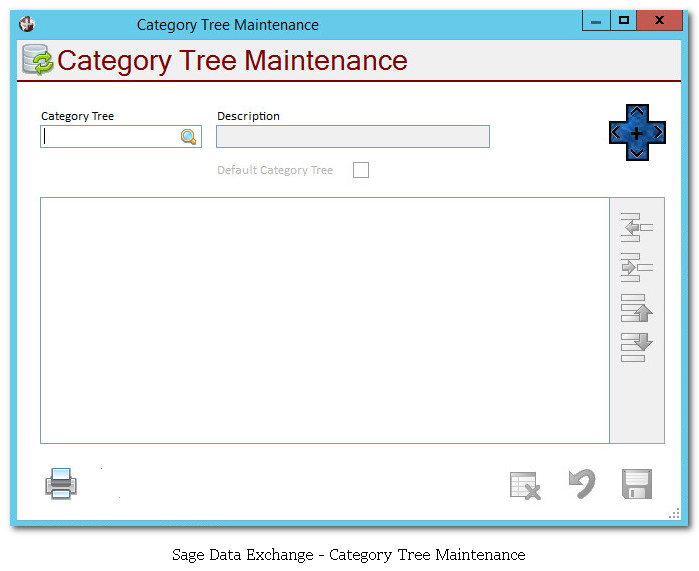
 The screen has four primary buttons. There is a directional button that has arrows pointing up, down, left and right. The up arrow will go to the first record in the table. The down arrow will go to the last record in the table. The left arrow will go to the previous record while the right arrow will go to the next record in the table. In the middle is a Plus sign and when that is clicked, the Category Tree value can be modified.
Other buttons on the screen are Delete, to delete the current record.

The cancel button which will not save the changes to the current record and will take you back to a blank Category Tree Maintenance screen with no Category Tree value entered.

The Save button which will save the changes to the current record and will take you back to a blank Category Tree Maintenance screen with no Category Tree value entered.

Buttons
There are two buttons on the Category Tree Maintenance Screen. One is the Print button  . The Print Button will print a list of the Category Tree information.
The Next button will be hidden until a Category Tree is selected. This button is the import Category Tree button  . This will import from Sage eBusiness the existing Category Tree so that you do not have to recreate it in Sage Data Exchange.
When the button is clicked a message box will appear warning that the import function will completely remove the selected Category Tree that exist in Sage Data Exchange and import the Category Tree from Sage e-Business Manager.
![]()
Click OK to import the Category Tree from the existing e-Business setup or click *Cancel* to close out of the import function without any changes to the Sage Data Exchange Categories.
When done it will return to the Category Tree Maintenance screen.
Fields
The following are the fields available on the Category Tree Maintenance Screen.
Category Tree
This is the Category Tree name. This would be the unique name given to the grouping of Categories. Use the Lookup button  to view a list of existing Category Trees. The Lookup button is only available if the field Category Tree is blank.
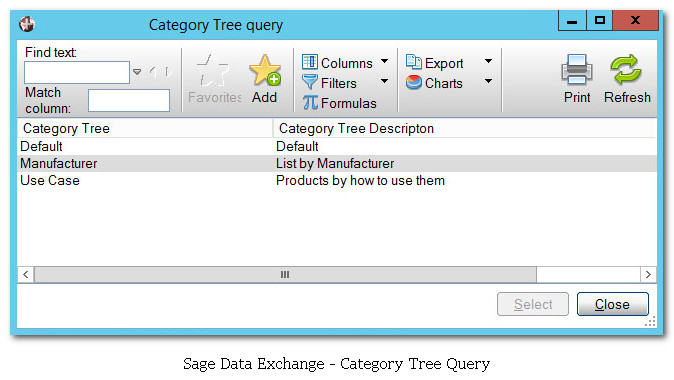
From the Category Tree Query, users can view all existing Category Trees along with their description. Highlight the Category Tree to be used and click select or double click on the Category Tree to be used. The query screen will be closed and the value will be placed in the Category Tree field.
Description
This is the description of the Category Tree that has been selected.
Default Category Tree
This checkbox will select which Category Tree is to be returned when a Tree is not specified.
Secondary Grid
The secondary grid is where the tree view of the Category Tree that has been selected is displayed.
Buttons
The list of Categories that belong to a Category Tree can be adjusted with the use of the buttons to the right of the Secondary Grid.
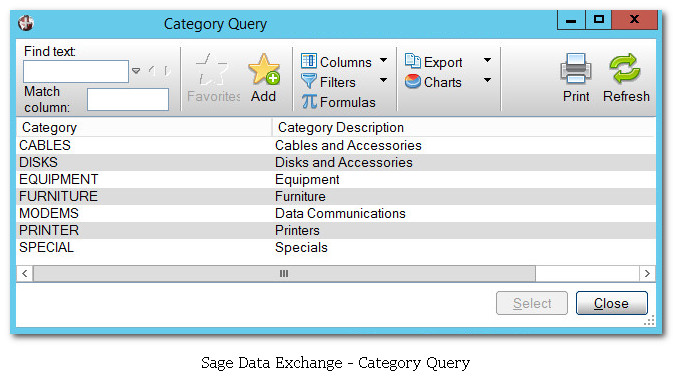
- To insert a Category, select the row you wish to insert to and click on the Insert Row button
 . This will then display the Category Query. Highlight the Category to be inserted to the tree and click select.
- To remove a Category, select the row to be removed and click on the Delete Row button

- To move the Category up by one row, select the row to move and click on the Move Up button

- To move the Category down by one row, select the row to move and click on the Move Down button
