Category Maintenance
A Category is a grouping of products. Sage 100, Inventory Maintenance has four user defined categories that allow a grouping of products. The Sage e-Business Manager module introduced Category Maintenance and Category Tree Maintenance. This allowed the website to have the ability to group products in multiple categories. A single item could be in one or many different categories. Sage Data Exchange can import this information if it exists from an install of e-Business or it can be entered in to the Sage Data Exchange Category Maintenance. To access the the maintenance field go to Application | Setup | Category Maintenance.
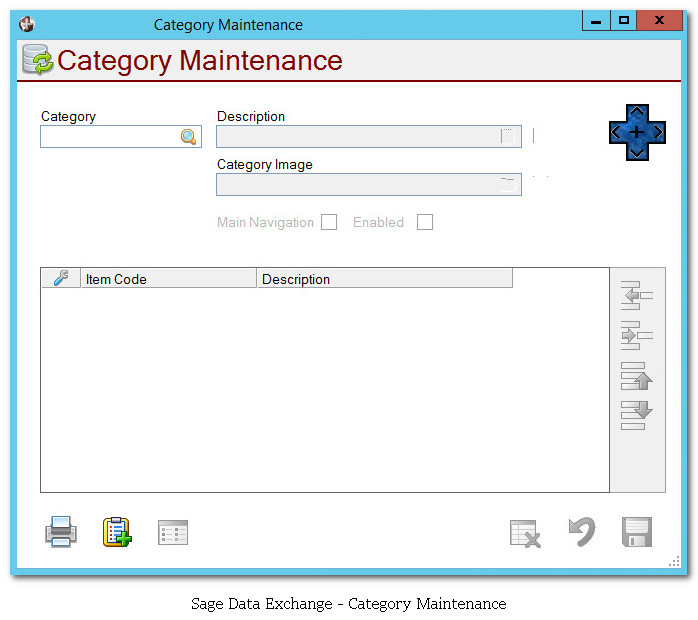
Navigation
 The screen has four primary buttons. There is a directional button that has arrows pointing up, down, left and right. The up arrow will go to the first record in the table. The down arrow will go to the last record in the table. The left arrow will go to the previous record while the right arrow will go to the next record in the table. In the middle is a Plus sign and when that is clicked, the Category value can be modified.
Other buttons on the screen are Delete, to delete the current record.

The cancel button which will not save the changes to the current record and will take you back to a blank Category Maintenance screen with no Category value entered.

The Save button which will save the changes to the current record and will take you back to a blank Category Maintenance screen with no Category value entered.

Buttons
There are three buttons on the Category Maintenance Screen.
One is the Print button that will print a list of the Category information from the screen. 
The next button is to Import Sage 100 e-Business Categories. 
When the button is clicked a message box will appear warning that the import function will completely remove any Categories that exist in Sage Data Exchange.
![]()
Click OK to import Categories from the existing e-Business setup or click *Cancel* to close out of the import function without any changes to the Sage Data Exchange Categories.
When done it will return to the Category Maintenance screen.

The last button is the Assign Properties.  The properties button will display a list of fields that are set to be a Property field in Return Maintenance for the specific Resource set to Products. When a Product Resource has a Column Name checked to be a Property, the Column Name or Alias is shown in the list of Properties.
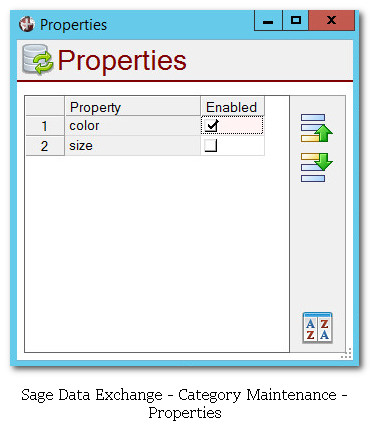
How to use Properties
Properties is a way to have a sub grouping value. This can refer to the custom categories group in Item Maintenance. When a property field is identified, the system will read through all the items to create a list of the properties values that are available. Using the Property screen, the category can now determine which properties would be used to list the values for the items. See the API Resource - CategoriesTo enable the property to return the values available for a Category, click on the box in the Enabled column. The list of enabled Properties will be returned in the order shown on the Properties screen.
- To move the row up by one row, select the row to move and click on the Move Up button.

- To move the row down by one row, select the row to move and click on the Move Down button.

Each Property that is returned for the Category will also have an array of values found for that Column Name. This list can be seen and the order of what is returned is maintained by highlighting the row of the Property to view and click on the Properties Values button.
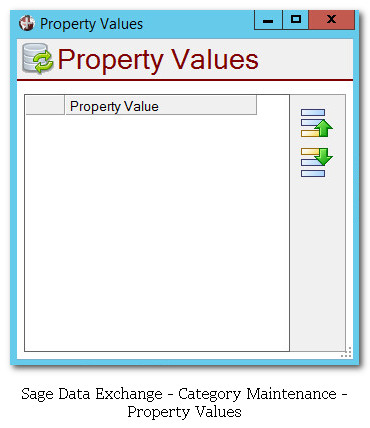
- To move the row up by one row, select the row to move and click on the Move Up button.
- To move the row down by one row, select the row to move and click on the Move Down button.
Fields
The following are the fields available on the Category Maintenance Screen.
Category
This is the Category name. It is case sensitive, meaning CASE is different than case. Use the Lookup button  to view a list of existing Categories. The Lookup button is only available if the field Category is blank.
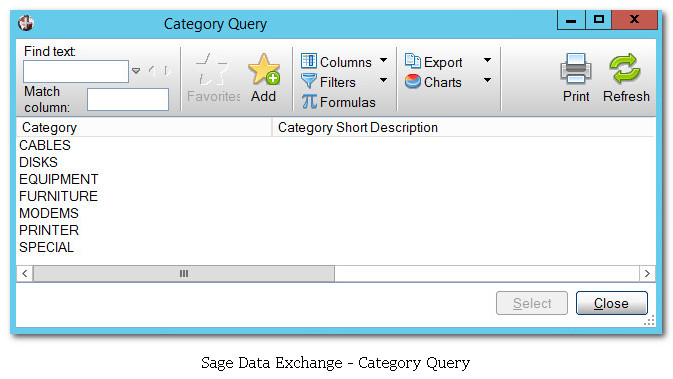
From the Category Query, users can view all existing Categories along with their description. Highlight the Category to be used and click select or double click on the Category to be used. The query screen will be closed and the value will be placed in the Category field.
Description
This is the description of the Category that has been selected. It is possible to enter HTML code in the description of the category. There is a short description which is displayed here that allows for 64 characters. There is also a short description that is 2k and a long description that is 4k in size.
Category Image
This is the full path to the image associated with the Category. The path can be looked up by clicking on the File Path button.  Navigate to the path that the image is saved and double click or select and click on open to copy the image to the images folder and make it available to Sage Data Exchange.
To view the image that is selected, click on the Image icon.  This will take you to the preview of the image. Click the X in the upper right to close the preview window.
Main Navigation
This is a check box that will indicate that this Category is a Category that should be listed as the top level.
Enabled
This check box will enable or disable the Category from being used.
Secondary Grid
The secondary grid is where the list of products associated to this Category is entered.
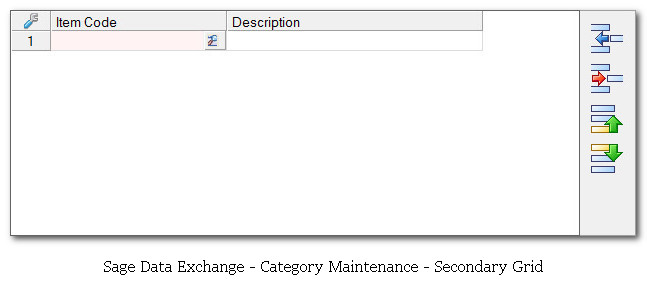 Rows will be added as item codes are entered in.
Fields
The following are the fields available on the secondary grid of the Category Maintenance Screen.
Item Code
This is the item code that will be associated with this Category. Each Category can have one or more Item Codes listed. The Item Code can be manually entered or can be looked up by clicking on the lookup button. 
When the lookup button is clicked the Item Query will display.
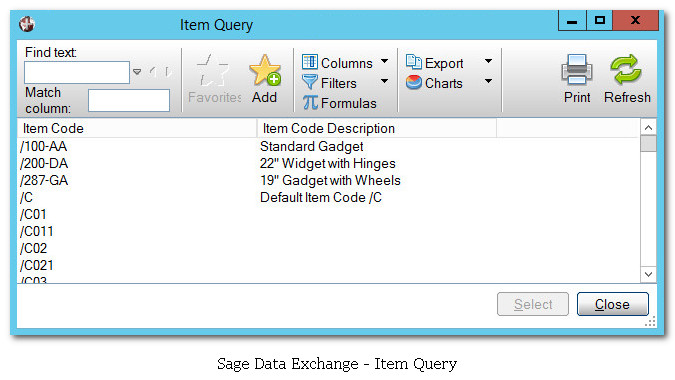 From the Item Query, users can view all existing Items along with their description. Highlight the Item to be used and click select or double click on the Item to be used. The query screen will be closed and the value will be placed in the Item Code field.
Description
After an item is entered in the secondary grid, the Description field becomes available. It will default with the description from the inventory maintenance and it can be modified here for Sage Data Exchange's list of Items related to the Category.
Buttons
The list of Item Codes that belong to a Category can be adjusted with the use of the buttons to the right of the Secondary Grid.
- To insert a row, select the row you wish to insert to and click on the Insert Row button

- To remove a row, select the row to be removed and click on the Delete Row button

- To move the row up by one row, select the row to move and click on the Move Up button
- To move the row down by one row, select the row to move and click on the Move Down button